Table of contents
Open Table of contents
Introduction
I recently started the fast.ai course to build up my practical deep learning skills. In order to better retain what I learn, I’m going to be writing a series of posts/notebooks, implementing my own models based on the course content. This notebook is written based on what I learned from the first week of the course.
In this notebook we’ll build an image classifier using the fastai, a deep learning library built on top of Pytorch that provides both high-level and low-level components to quickly build state-of-the-art models for common deep learning domains.
We’ll build a model that can classify images of fruit into a binary category: rotten or not. You can imagine such a model being used inside refrigerators to detect if produce kept inside it has gone bad.
When I started learning ML in 2016, building such models was a non-trivial task. Libraries to build deep neural networks were still in their infancy (Pytorch was introduced in late 2016), and building accurate image classification models required a certain degree of specialized knowledge. All that has changed and, as you’ll notice in the notebook, we can build an image classifier using just a few lines of code.
Let’s get started!
import os
# !pip install -Uqq fastai duckduckgo_search
We’ll be needing the duckduckgo_search package to quickly search for, and download images of rotten and fresh fruit to feed to our model. An advantage of using this library over other alternatives is that you don’t need to set up an API key for basic usage.
Downloading images of rotten and fresh fruit
from duckduckgo_search import ddg_images
from fastcore.all import *

def search_images(term, max_images=40):
    """Searches for and returns images for a given term"""
    print(f"Searching for '{term}'")
    return L(ddg_images(term, max_results=max_images)).itemgot('image')

urls = search_images('rotten fruit', max_images=1)
urls[0]
Searching for 'rotten fruit'
'https://i.pinimg.com/originals/13/2e/48/132e481c0ef6f1516de2b5b80a553b6a.jpg'Let’s download this image and open it.
from fastdownload import download_url
dest = 'rotten.jpg'
download_url(urls[0], dest, show_progress=False)

from fastai.vision.all import *
im = Image.open(dest)
im.to_thumb(256,256)
Doing something similar for fresh fruit.
download_url(search_images('fresh fruit', max_images=1)[0], 'fresh.jpg', show_progress=False)
Image.open('fresh.jpg').to_thumb(256,256)
Searching for 'fresh fruit'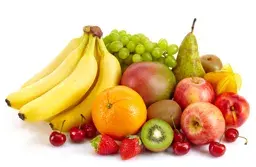
Now that we know what duckduckgo image search is working fine, we can download images for both rotten and fresh fruit and store them in their respective directories. We use time.sleep to avoid spamming the search API.
searches = 'rotten', 'fresh'
path=Path('rotten_or_fresh')
from time import sleep

for o in searches:
    dest = (path/o)
    dest.mkdir(exist_ok=True, parents=True)
    download_images(dest, urls=search_images(f'{o} fruit'))
    sleep(5)  # Pause between searches to avoid over-loading server
    download_images(dest, urls=search_images(f'{o} apple'))
    sleep(5)  # Pause between searches to avoid over-loading server
    download_images(dest, urls=search_images(f'{o} banana'))
    sleep(5)  # Pause between searches to avoid over-loading server
    download_images(dest, urls=search_images(f'{o} vegetables'))
    resize_images(path/o, max_size=400, dest=path/o)
Searching for 'rotten fruit'
Searching for 'rotten apple'
Searching for 'rotten banana'
Searching for 'rotten vegetables'
Searching for 'fresh fruit'
Searching for 'fresh apple'
Searching for 'fresh banana'
Searching for 'fresh vegetables'Training our model
We have our images and the next step is to train a model. Again, it blows my mind how simple this is using fastai. I’ll briefly explain what the below blocks of code are doing.
First, we check if all image files can be opened correctly using a fastai vision library utility verify_images. If it can’t be opened, then we unlink it from our path so that is is not used in model training.
# validate images
failed=verify_images(get_image_files(path))
failed.map(Path.unlink)
len(failed)0Next, we’ll use another building block from the fastai library, the DataBlock class, which we can use to represent our training data, the labels, data splitting criteria, and any data transformations.
blocks=(ImageBlock, CategoryBlock) is used to specify what kind of data is in the DataBlock. We have images, and categories - hence a tuple of ImageBlock and CategoryBlock classes.
get_items takes the function get_image_files as its parameter. get_image_files is used to find the paths of our input images.
splitter=RandomSplitter(valid_pct=0.2, seed=42) specifies that we want to randomly split our input data into training and validation sets, using 20% data for validation.
get_y=parent_label specifies that the labels for an image file is its parent (the directory that the file belongs to).
item_tfms=[Resize(192, method='squish')] specifies the transformation performed on each file. Here we are resizing each image to 192x192 pixels by squishing it. Another option could be to crop the image.
dls = DataBlock(
    blocks=(ImageBlock, CategoryBlock),
    get_items=get_image_files,
    splitter=RandomSplitter(valid_pct=0.2, seed=42),
    get_y=parent_label,
    item_tfms=[Resize(192, method='squish')]
).dataloaders(path, bs=32)

dls.show_batch(max_n=6)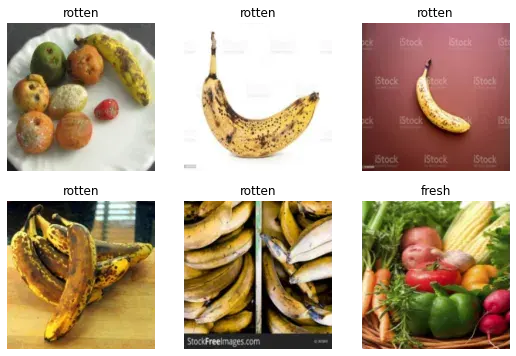
Above you can see a batch of images from our DataBlock, along with their labels. This is a nice way of quickly knowing if a sample from our data is correct (images/labels).
To train our model we will fine-tune the resnet18, which is one of the most widely used computer vision models, on our dataset.
clf = vision_learner(dls, resnet18, metrics=error_rate)
clf.fine_tune(5)| epoch | train_loss | valid_loss | error_rate | time |
|---|---|---|---|---|
| 0 | 1.116146 | 0.663511 | 0.225806 | 00:08 |
| epoch | train_loss | valid_loss | error_rate | time |
|---|---|---|---|---|
| 0 | 0.261161 | 0.377953 | 0.145161 | 00:02 |
| 1 | 0.191016 | 0.260379 | 0.096774 | 00:02 |
| 2 | 0.136843 | 0.273550 | 0.096774 | 00:02 |
| 3 | 0.105194 | 0.308478 | 0.112903 | 00:02 |
| 4 | 0.086769 | 0.280475 | 0.112903 | 00:02 |
Using the model
It’s finally time to use our model and see how it does predicting if a fruit is rotten or not.
Image.open('rotten.jpg').to_thumb(256,256)
is_rotten,_,probs = clf.predict(PILImage.create('rotten.jpg'))
print(f"This fruit/vegetable is: {is_rotten}.")
print(f"Probability it's rotten: {probs[1]:.4f}")
This fruit/vegetable is: rotten.
Probability it's rotten: 1.0000Image.open('fresh.jpg').to_thumb(256,256)
is_rotten,_,probs = clf.predict(PILImage.create('fresh.jpg'))
print(f"This fruit/vegetable is: {is_rotten}.")
print(f"Probability it's fresh: {probs[0]:.4f}")
This fruit/vegetable is: fresh.
Probability it's fresh: 1.0000Classifying images of rotten and fresh oranges
Let’s see if our model can predict if a given image is of a rotten orange or a fresh orange. We haven’t explicitly downloaded images of fresh/rotten oranges for our training set, so it would be a good generalization on “unseen data”.
download_url(search_images('fresh orange', max_images=1)[0], 'fresh orange.jpg', show_progress=False)
Image.open('fresh orange.jpg').to_thumb(256,256)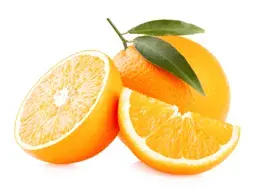
is_rotten,_,probs = clf.predict(PILImage.create('fresh orange.jpg'))
print(f"This fruit/vegetable is: {is_rotten}.")
print(f"Probability it's fresh: {probs[0]:.4f}")
This fruit/vegetable is: fresh.
Probability it's fresh: 0.9748download_url(search_images('rotten orange', max_images=1)[0], 'rotten orange.jpg', show_progress=False)
Image.open('rotten orange.jpg').to_thumb(256,256)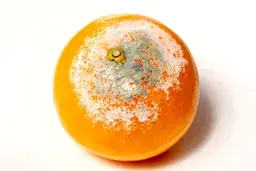
is_rotten,_,probs = clf.predict(PILImage.create('rotten orange.jpg'))
print(f"This fruit/vegetable is: {is_rotten}.")
print(f"Probability it's rotten: {probs[1]:.4f}")
This fruit/vegetable is: rotten.
Probability it's rotten: 0.9899Not bad at all. The model seems to generalize fine. Though, a more accurate measure of generalizability would involve creating a separate test set and calculating performance metrics.
Summary
There you have it! With a few lines of code we have created our own image classification model by fine-tuning off the shelf models with fastai. The high level apis that the library provides makes the process of building an initial model a breeze. If you want to run the notebook for yourself, you can check it out on Kaggle here. I urge you to try building your own classification model on images from duckduckgo search.
I’ll be going over the rest of the fastai course in the coming weeks. Even though I have only done the first two weeks till now, I highly recommend it for anyone interested in Machine Learning, more so for people with a coding background.
Resources
- fastai Course: https://course.fast.ai/
- Notebook on Kaggle: https://www.kaggle.com/code/sajalsharma26/is-the-fruit-rotten-or-not